A knife is an essential tool for bushcraft, but to perform well all the tasks, needs to be sharpened after use and… Abuse in the wild.
So also a sharpening kit is a necessary item in a wilderness survival kit. Unlike certain web views and opinions, I completely agree this article ‘Sharpening is a Simple Act‘
from this great blog http://paleotool.com/, i also think that sharpening is not a ‘supernatural’ skill, but a process that you can learn day by day and step by step with experience.
Watching internet tutorial you can understand that everyone has their own method, so I suggest to follow… yourself!
Now the main question is …What are the best field sharpeners?
I can suggest you to buy one of these:
- a versatile Fallkniven DC4 (there is a smaller version DC3) – two different grit: ceramic side and diamond side.
- OR a Lansky Blademedic – different tools for different blades.
- OR a whetstone.
- OR a waterstone for a more ‘spiritual approach’ ( there are some not too expensive like Suehiro).
I intend to review all these in other articles.
However if don’t want to buy one of these kits or if you like Do It Yourself …
I’ve two different example.
The ‘Classic way’
inspired by Mors Kochansky tutorials and book.
What you need?
- Sandpaper in different grits;
- Plywood;
- double sided tape.
Cut a rectangular piece of plywood, obviously in a useful size for your backpack, (I can suggest 15-18 cm long and 5 cm large) and cover both side with double sided tape.
Cut the sandpaper with the same size of plywood and stick onto the tape.
Write on the small side of the piece the grit size.
What are the best grinding size? For the knives i’ve learned 600-1200.
This combination works well, so you have a perfect kit: one grit for rough sharpening, the other for fine sharpening.
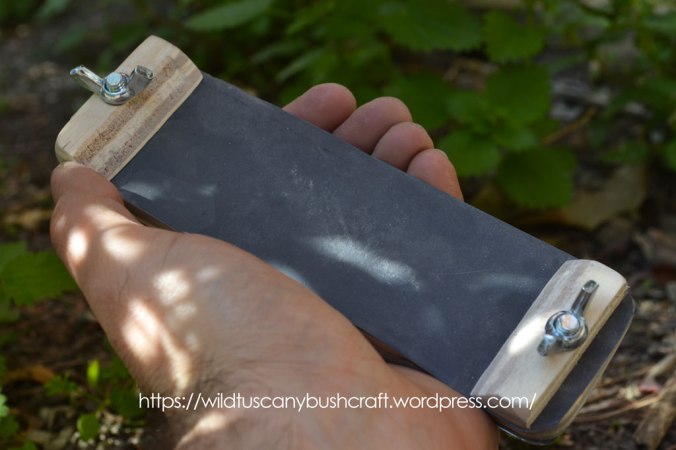
My Sharpening Kit.
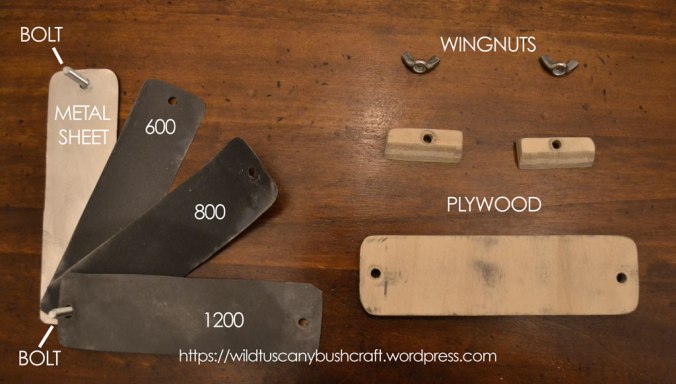
- Sandpaper in various grit,
- plywood,
- 2 x Ø 6mm – 30mm height bolts ,
- 2 x Ø 6mm wingnuts,
- a small piece of metal sheet.
My way needs more work at home but the result is a full sharpening kit, you could even add a piece of leather to complete the sharpening process with stropping.
Cut a piece of plywood (15-18 cm x 5 cm) smooth the angles with a file and sandpaper.
This will be the cut model for custom sandpaper sheets.
Cut in the same size a piece of metal sheet.
This piece is a cover to protect and store other sandpaper sheets (you’ll insert these between plywood and steel)
Drill two holes Ø 6 mm at the ends of these items.
In my model, i’ve tried to avoid the use of double sided tape to easily replace used sheets on the field, in fact this tool require a bolt and a wingnut and a small piece of plywood on each short side, to hold firmly sandpaper.
As you can see in the picture small pieces of plywood have an angled cut. This angle could be a guide to mantain the right edge.
I hope these short tutorials have been useful for you.
Have a nice bush walk!
Ciao!


pretty cool kit, might give it a shot, as it is indeed quite annoying to scrape of the double sided tape.
LikeLiked by 1 person
Cool idea for a sharpening kit! Great execution
LikeLike
Thank you friend! Thank you very much!!
LikeLike
I see that you have been with Frontier Bushcraft! So you have meet Paul Kirtley! It’s a great communicator, I follow his blog and his posts help me to improve the quality of my bushcraft equipment. Ciao!
LikeLike
I listened to one of Pauls podcasts a couple of months ago and have him subbed in youtube. He’s very knowledgeable, no doubt. Definitely a Diehard Bushcrafter.
LikeLiked by 1 person
Ahah yes! I like his approach! From his blog I have learned many things! Ciao Patrick!
LikeLike
Reblogged this on The Survival Library.
LikeLike
Thank you friend!
LikeLike
Very nice post on DIY knife sharpening kits I am always looking for well written articles to repost. I have always been into wilderness survival and prepping but have recently been concentrating on increasing my bushcrafting skills. I am also getting into building my own gear where possible.
LikeLike
Thank you very much!! I can suggest you this blog http://paulkirtley.co.uk/ it’s a very interesting blog about Bushcraft and outdoor skills!
LikeLiked by 1 person
Bravo! Affilo i miei coltelli e la mia ascia con un Spyderco Doublestuff (ceramica).
LikeLike
Ciao!!! Grazie :)! Interessante anche la Spyderco Doublestuff. Cercherò di provare tutte le marche negli anni, voglio farmi un’idea completa!
LikeLike
Great idea and build! The tool is similar to a drywall sanding tool I own. Just secure sand paper to the head and go to town.
LikeLike
Many Many thanks!!!!!!!
LikeLiked by 1 person
Great article! In my bushcraft training and kit I personally use a pre-set sharpener like this:
http://www.amazon.com/gp/aw/d/B000O8OTNC/ref=s9_simh_gw_d5_g469_i2?pf_rd_m=ATVPDKIKX0DER&pf_rd_s=mobile-1&pf_rd_r=0CWASPWQ345WFPGPMEXT&pf_rd_t=36701&pf_rd_p=2068141862&pf_rd_i=mobile
My knife has a sharpening stone in its sheath so in my down time I practice with it. But, I personally think it’s best for me to use a sharpener like the one listed above because in a real situation I’d want a quick way to get my knives in serviceable condition quick. Plus, I admit I have not mastered the art of sharpening a knife by way of whetstone and such very well yet.
LikeLike
Welcome and many many thanks John!!!! Knife with a sharpening stone…Do you have an ontario like this? 499 Survival
I’ve seen the smith’s PP1 time ago, it’s a good field sharpener, similar to Lansky Blademedic that I have, like this, it’s very functional for survival blades (there aren’t problems with sharpening angles) but in my opinion it’s not the best for a bush knives with scandi blade. I personally prefer simple flat sharpeners (or whetstone like yours) because they are more versatile… but with some ‘risk’… 😀
There some advantages using this type of sharpener:
– maintaining the right angle isn’t so hard once you get used to it, and you can obtain a scary sharp blade…(adding a Nagura)
– you are prepared to sharp your knife also in a ‘survival scenario’ with… a river rocks!
Ciao Mattia!!
LikeLike
Thank you for the links! Yes I do have that OTC 499. After a long OCD search I finally settled on this. I personally like the parkerized blade. This knife is a right hefty chunk of carbon steel which I like. I can use the back like a file. I was between this and the Gerber LMF II Infantry. Price won me over to the OTC. And, I just thought it looked like a bushcraft knife.
However, I’m starting to think its not so good with wood working. I’ve been making a hearth board for primitive fire making. I’m making it out of cedar. Maybe not the best material but it’s trial and error. I’ve handled most everything with my hatchet. Though this knife does baton very well!
I’m still learning about Scandinavia grinds and such. And the best way to sharpen these grinds. Angle is a problem for me but I’m finding out tricks to keeping consistency. Are you supposed to use oil or water on the stone while sharpening?
LikeLike
Hi brother! 🙂 It depends on sharpening stone: with Arkansas type use honing oil or other useful mixture. With a fallkniven Dc3, Dc4 or sandpaper: water, spit, or nothing. Scandinavia grinds are really simple to sharpen try with a cheap and super useful Mora (the king of bushcraft)! Simply «…lay your knife on the stone and raise the back until the bevel lies flat on the stone…» (Ray Mears – Essential Bushcraft – Hoddler & Stoughton) 👌🏻. Where do you live? Usa? If you search for a bushcraft knife I’ve found a new interesting blade by CRKT: the Saker survival knife (not cheap), if you search for traditional northern blades search on the site Lamnia( beautiful and razor knives) not too expensive! If you search for good, cheap, nice, retro look skandi blades Condor tk! Ciao Mattia
LikeLike
Wow, great post and build. I need to make one myself. Cheers! Big E.
LikeLike
Super thanks! Let’s see your Diy sharpener !! Ciao Mattia !!
LikeLike
This is a great article for this website and for anyone who owns and uses knives and wants to maintain them. There are people who prefer using sandpaper because it’s cheap and just as versatile or rather more so, than a pile of sharpening stones. I have small pocket size diamond stones and rods, and 2-3 pull thru sharpeners with ceramic rods, but I purchased a belt sander to sharpen my knives and machetes when they get really dull.
For out in the field, paint stir sticks, narrow boards, or a short length of PVC pipe with sand paper glued, taped, clipped or screwed allows better sharpening of any size blade since you can create any size, or length of “tool” with various grades of paper that are best for the item you want to sharpen.
The way I have seen the paper taped to PVC pipe was with masking or duct tape wrapped around the ends. That would avoid the problem with the double sided tape. There are also re-possitionable, non-permanent spray glues.
So I am sold on this idea whether I use a belt sander, a wheel in a dill chuck, a manual device like yours or paper on a stick or board. I am not against stones, but they just cost too much where as one can easily afford a multi-pack of sandpaper or emery cloth and a roll of tape if needed.
LikeLiked by 1 person
Thank you so much for sharing your experience Frank!
I like to sharp my knives in these ways or with the fallkniven stones (DC4 or DC3, they are not too expensive here)
Time ago I bought also a cheap waterstone to emulate Ray Mears in one of his videos and it really works!
I had not experience with electric tools, but I’m sure that in the properly way they can really make super sharp blades !
I want to try next time to make a sharpening stone with river’s pebbles, to test my improvisation skills.
Cheers brother !
Mattia
LikeLike