
Belt pouches are in my opinion a convenient and useful way to carry an essential wilderness survival kit during a hike.
What is the most suitable? I think It’s really a personal choice.
You can read reviews, you can find so many models, various materials, different concepts… If you like natural material and the ‘old ways’…perhaps you are looking for something traditional, something unique, so why don’t you create it yourself?
In my opinion there is a great, unrivaled satisfaction in the making, testing and customizing your own gear, this is also a way to explore the human history and improve your skills and… perhaps to find a new hobby!
Months ago I’ve written another post about this subject (read the article) inspired by late medieval purse pattern, now I would show you my new leather belt pouch and a tutorial on how make your own.
The aim of this new project is to use only natural material (leather, antler/wood, hemp twine or…tendons) avoiding steel buckles closure to give a primitive look to this pouch.
What you need?
Materials
- If you have to buy the leather, choose vegetable-tanned instead of chemical-tanned leather, so you’ll work something processed with an historical and artisanal technique that uses tannins, these are found naturally in some plants species.
- In a local store buy an hemp twine, not too large (1mm, max 2mm), because you’ll use it to sew your leather pieces.
*tip – rub it on beeswax to strengthens it. - You need also two small pieces of antler (I use a roe deer antler that a friend of mine has found in the wood) or bone.
If you can’t find anywhere antler or bone you could make your closure with wood.
Tools
The working tools are quite similar to the previous tutorial (extra elements are for antler) :
- my paper model;
- a pen;
- needles;
- a sharpen knife or a shoemaker knife or a cutter;
- large scissors;
- round hammer, mallet
- if you can’t find a fork (? read the previous article) use a leather awl to punch holes on the leather;
- a rotary punch;
- a metal saw;
- a drill;
- a metal file;
- sandpaper sheets in different grit;
Working steps
- Download and print in 1:1 scale (A4) my paper model (PDF file – 4 pages) by clicking this link.
- With scissors cut out the paper shapes.
- Place the paper models over the rear of leather (the rough face) and with a pen re-draw the shapes.
- With a cutting tool, cut out the leather shapes.
- Follow step-by-step the assembly instruction in the image below, first punch holes and start sewing the rear of leather panels.
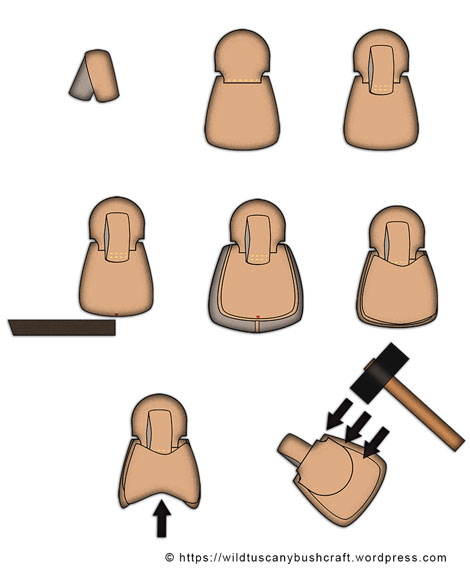
Assembly instructions

- Before turn it inside out, wet the leather with water (or denatured alcohol), don’t soak the leather.
- Turn the leather inside out and with an hammer give on the folding area few smacks. This help you to form the pouch.
Repeat this step also along the folding line of your pouch flap and the belt strap. - If you can, cut 2 leather string from your leather and soak in water then fix the string with a screw and twist it.
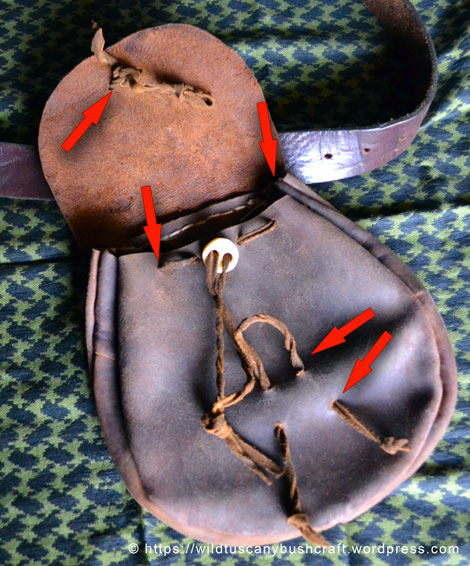
When it’s dry you have your leather string. - Use the rotary punch to make 14 holes (look arrows in the image below) for the leather string

- Use the rotary punch to make 4 holes in the front face of your pouch (this will be the lace closure) and other 2 on the flap.
- It’s time to work with antler! Secure the antler in the workbench and with the metal saw cut a small round piece and another cylindrical.
Work with the file and sandpaper to make these harmonious. With the drill make two holes on both pieces. - The finished assembly should look like this.


If you want to give to your pouch a ‘used patina’ you could use a bit of olive oil. Rub the olive oil into the leather and expose it to the sun.
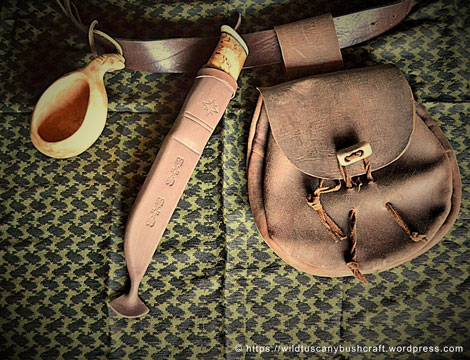
You have completed your work!
Now you have a multipurpose pouch use it for your kit, for your compact camera, your phone!
Ciao, Bye, Tschüß, またね!
Mattia

Bellissimo!! Ho fabbricato la mia borsetta con un vecchio poncho esercito svizzero. Non è così estetica come il cuoio, ma è la dimensione giusta per una borsetta di pipa e tabacco. 🙂
LikeLiked by 1 person
Grazie! È sul tuo blog vero? Hai una foto?
LikeLike
Pensavo che ho fatto i foto del sacchetto, ma non riesco a trovare alcun. È di circa 20 cm di 5cm, dimensione perfetta per me :).
LikeLiked by 1 person
Non preoccuparti, se poi riesci a trovarle fammi sapere! Io pochi giorni fa ho comprato su ebay anche una swedish ammo pouch, non è molto grande ma è di forma regolare e in cuoio robusto marrone, potrebbe andare bene per un mini kit.
LikeLike
great work once again sir
LikeLiked by 1 person
Thank you John !!!!!!!!
LikeLike
Holy Mahoney. That is some hard core work. Beautifully done.
LikeLiked by 1 person
T H A N K S !!!!!!!!
LikeLike
Pingback: Prometheus, the fire and the bushcrafter | Wild Tuscany Bushcraft
Can I see a picture of the bottom of the bag where the two side strips meet?
LikeLiked by 1 person
Hi Kyle!

This is a pic of the bottom of my bag, I hope it will help you!
LikeLike
I am trying to make this put lost on some of the steps of assembly. I have the pattern cut out, I see that I am to sew the back pieces on first but I have no idea how to assemble the side pieces and attach the front. Could you give a better explanation? Thanks
LikeLiked by 1 person
Hello Cassidy!
Try to sew together first the two side panels to make a unique panel. Start to sew it placing it (using the stitching line as guide) in the middle bottom of the back piece. Remember that you are assembling the internal part of the pouch. When you’ll finish to stitch together all the pieces you’ll have to revert it completely to hide the stitching points.
LikeLike
Hello, I’m planning on making this. You never mentioned the weight or amount of leather you need? My is typical garment size I believe maybe 1.2 oz thickness? would this be too floppy or do would it work? Also, why do the side panels in two peices and not as a single piece and avoid an additional seem? Just curious if there was a purpose for this as far as bag integrity or something?
LikeLiked by 1 person
Hello !!! I made at least 6-7 five different models of them. Yes one panel is a good solution to save time! I think it will work also the garment size you write. Usually I like to recycle piece of leather from old unused things, so I think you should try.
Another cool idea could be to mix together waxed canvas and leather!
Show me the result !
See you soon Donna !
Mattia
LikeLike